Jessica's Photography

  • Home
  • Gallerie
    • Engagements
    • Weddings
    • Family Portraiture
    • Portraits
    • Commercial
  • Blog
  • Shop
  • About
  • Contact

How to Host a Beautiful Galentine Luncheon

January 30, 2018

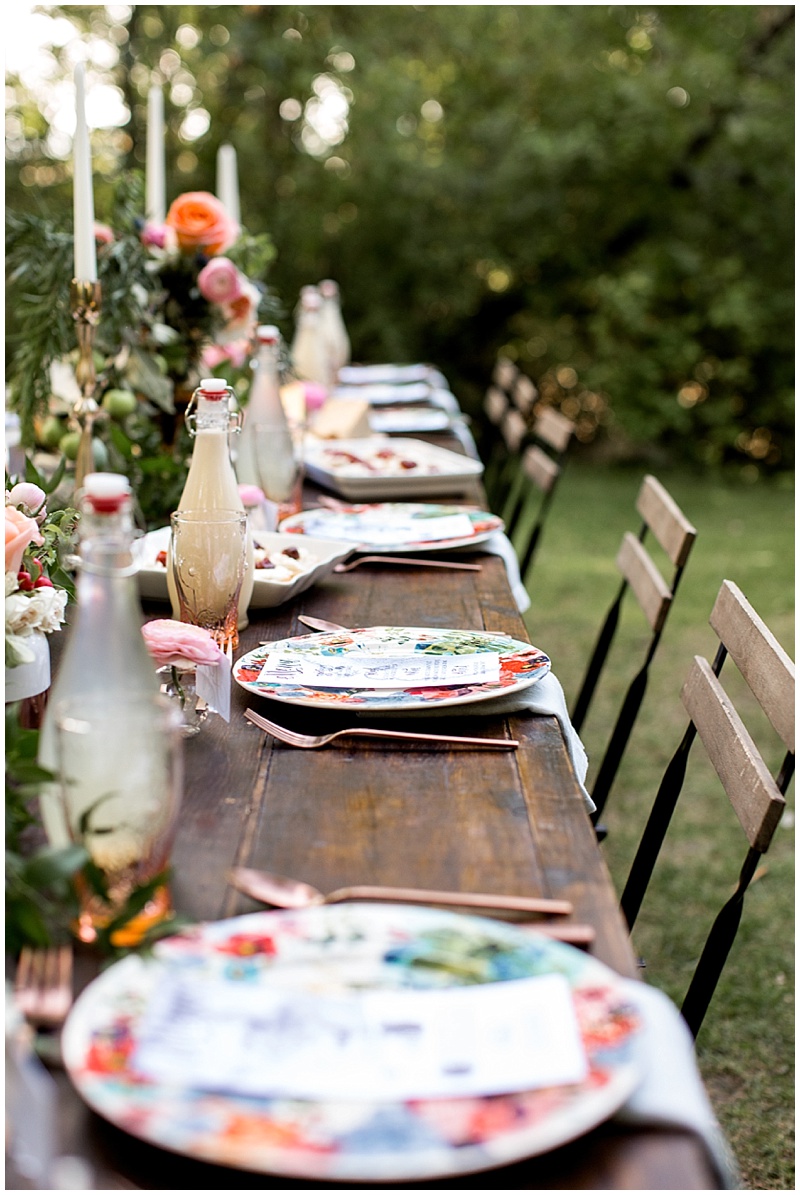
This lovely little luncheon is featured on Cottage Hill today!  Amber Reverie and I hosted this little gathering with some local creatives and it was such a good time getting to know new people and eating good food in such a beautiful venue, Ember SLC was a new intimate location when we hosted it, they have so many cool spaces.  Amber did the amazing florals, I just loved all of the details that she put together!  Annie with Wildfield Paper Co, made the most stunning menus!

One of my favorite things is to bring together people and cook for them!  I wish I could do it more often!  Even just small dinners in our home, Cole and I’s schedules are hard to work around and not many people would want to start a dinner party at 9:30 pm!  Maybe one day we will stop working at normal times of the day!  And I dream of the day for us to have a beautiful dining room and yard so that we can host dinners more often.

Here are some of my favorite recipes!  I hope you enjoy, let me know if you try them!

Best Utah Wedding Photographer

Best Utah Wedding Photographer

Tarragon Cream Crostini
1 cup ricotta cheese
2 tablespoons fresh tarragon
1 small garlic clove
sea salt

Combine all ingredients in a food processor, puree until smooth.

Recipe from Ecco La Cucina, by Gina Stipo. I got this cook book in Italy when I attended a cooking class in Siena, some of my favorite recipes are from this book! https://www.amazon.com/ecco-cucina-Gina-Stipo/dp/0615593658

Best Utah Wedding Photographer

Roasted Butternut Squash Soup
1 large onion, chopped
4 tablespoons butter and olive oil combined
8 cups butternut squash
6 cups chicken or vegetable broth
1/2-1 cup cream
1/2 teaspoon fresh nutmeg
sea salt

Split squash in half, coat the ends with olive oil and roast in the oven at 375 until soft. Once it cools scoop squash into a bowl. Sauté onion in butter in oil until soft and translucent, add roasted squash and sauté for a few minutes. Add a small amount of broth and continue to cook to meld flavors for at least 30 minutes, adding broth as necessary to keep from sticking or burning. Salt to test and add nutmeg.
Puree the mixture using an immersion blender. Return to heat adding enough broth to form a thick soup, about 10 minutes.
Stir in the cream, keep hot but do not boil.

Recipe from Ecco La Cucina, by Gina Stipo. I got this cook book in Italy when I attended a cooking class in Siena, some of my favorite recipes are from this book! https://www.amazon.com/ecco-cucina-Gina-Stipo/dp/0615593658
Best Utah Wedding Photographer

Blueberry Galette
Ingredients:

For the Crust:

1 cup (226 grams) unsalted butter, cold and cut into cubes
2 1/2 cups (310 grams) all-purpose flour
1 tablespoon (10 grams) sugar
1 teaspoon (4 grams) salt
1/2 cup + 1 tablespoon buttermilk, cold

Filling:

1 pound (510 grams) fresh blueberries
1/3 cup (60 grams) sugar
2 tablespoons (20 grams) cornstarch
1/4 teaspoon (1 gram) fresh ground nutmeg
Zest of 1 lemon

Assembly:

1 egg, for egg wash
Sanding sugar, for sprinkling

To make the pie crust, in a large bowl, stir together the flour, sugar and salt. Add the butter and toss to coat the butter. Dump entire contents of the bowl out onto a well-floured surface. With a well-floured rolling pin, roll the mixture together, flattening the butter into the flour. Use a bench scraper to bring the mixture back together again as needed. When the butter is in long sheets and evenly distributed through the flour, return the mixture to the bowl and create a well in the center.
Add the buttermilk into the well and use your fingers or a wooden spoon to combine. Add more buttermilk a tablespoon at a time, if necessary, but the mixture should be a little on the dry side. Dump the contents back onto your floured surface and divide into 6 disks. Wrap in plastic wrap and chill in the fridge for one hour or overnight.
To make the galettes, preheat oven to 400 degrees and line 2 sheet pans with parchment paper.
Combine the sugar, cornstarch, nutmeg and lemon zest in a bowl. Add the blueberries and toss to coat. Roll out each disk of pie dough into an 8-10 inch circle. It doesn’t need to be exact or even. Spoon 1/6 of the blueberry mixture into the center of each disk and fold the dough up and over the filling. Brush with the dough with the egg wash and sprinkle with the sanding sugar.
Place the galettes on the prepared sheet pans and bake until crust is golden and the filling is bubbling, about 30-35 minutes, rotating the sheet pans halfway through.
Serve warm or at room temperature. Store galettes in the fridge for up to 3-4 days

Recipe from Completely Delicious, https://www.completelydelicious.com/blueberry-galettes/
(To save time, I make the crust in a food processor, and you can make it several days ahead, to help save time on the day of the party, and they look so fancy, but they are soooo easy!)

Best Utah Wedding Photographer

I love Charcuterie Boards if you can’t tell!

I love getting my cheeses from our local cheese maker Rockhill Creamery, I also love cheeses from Trader Joe’s.
Best Utah Wedding Photographer

Flaky Butter Pear Tarts
Ingredient
For The Pastry Dough:
1 cup all purpose flour
1/2 tablespoon Kosher salt
2 sticks unsalted butter kept very cold and cut into small chunks, 8oz
2 1/2 tablespoons iced water
For The Filling:
2 1/4 ounces unsalted butter softened
2 1/4 ounces sugar
1 large egg
6 tablespoon all purpose flour
1 teaspoon vanilla extract
3 1/2 vanilla pudding (You can buy it pre made or make your own, I make my own)
2 large ripe pears
2 tablespoons sugar for sprinkling on top
Glaze:
3 tablespoons water
3 tablespoons sugar
Instructions
Preheat the oven to 350 degrees F. Lightly butter 6 four inch tart shells.
In a bowl combine the flour, salt and cold butter chunks. Rub them together with your fingertips until most of it has been squashed. You still want to keep large chunks as this helps with the pastry layers.
Add the iced water and gently mix together with your hand until a soft ball forms.
Wrap it in plastic wrap and store in the fridge for at least 15 minutes.
Using a stand mixer, beat the soft butter and sugar together until light.
Add the egg and vanilla, beat until it’s all well mixed together.
Fold the flour into the mixture and then the vanilla pudding. Set aside.
Once the pastry dough has rested, roll it out to about 1/4 inch thick and cut out circles large enough to fill 6 four inch tart shells.
Place the dough into the tart molds and trim to fit. Transfer to the freezer for 15 minutes to rest.
Blind bake the pastry shells using parchment paper and dry beans in the oven for 20 minutes.
Once the shells have cooled slightly, fill them with about a heaped tablespoon of the filling mixture.
Peel the pears and slice into four wedges around the core.
Take each wedge of pear and slice it again thinly. This will be the pear slices which will go on top of your filling mixture.
Once you slice the pear thinly, push it down with your fingers to create the fanned look, place your knife below the slices and scoop them up and place them on top of the filling mixture.
Gently push the down slightly until some of the mixture comes up over the sides of the pear. This will give the tarts the look of the sponge top around the edges.
Sprinkle the tarts liberally with the 2 tablespoons of sugar. Turn the oven up to 375 degrees F.
Place on a baking sheet and bake for about 55 minutes and the tops start to get golden brown in color.
Once the tarts have cooled, combine the water and sugar in a small pan and bring to a boil. Simmer for about 5 minutes until it thickens into a syrup and using a pastry brush, carefully glaze the tops of the tarts to get a nice shine.

Best Utah Wedding Photographer

Arugula, Pear and Goat Cheese Salad with a Pomegranate Vinaigrette 

Vinaigrette

1 large shallot, halved and thinly sliced
1 tablespoon pomegranate molasses
2 tablespoons sherry or apple cider vinegar
1/2 teaspoon kosher salt
1/4 teaspoon black pepepr
1/3 cup extra virgin olive oil

For the salad

4 cups arugula, lightly packed
4 cups romaine, torn into bite-sized pieces
2 ripe pears, cored and cut into 1/2″ cubes
1/3 cup pomegranate seeds
3 ounces fresh goat cheese or feta, crumbled
1/4 cup pistachios, toasted and coarsely chopped

In a small bowl combine the shallot, pomegranate molasses, vinegar, salt and pepper and whisk until the salt is dissolved. Whisk in the olive oil and let vinaigrette stand at room temperature until salad is assembled. Combine the arugula, romaine, pears and half of the pomegranate seeds in a large bowl. Crumble half of the goat cheese over the ingredients in the bowl (this works best if the cheese is very cold). Whisk the vinaigrette until uniform and add all but 2 tablespoons of it to the bowl. Gently toss the salad with your hands or salad tongs, coating the ingredients well with the vinaigrette. If the salad seems dry, add the vinaigrette in small increments until it is dressed to your liking. Crumble the remaining cheese over the salad and sprinkle the remaining pomegranate seeds and the pistachios over the top. Serve immediately.

Recipe from Food52 https://food52.com/recipes/1666-arugula-pear-and-goat-cheese-salad-with-pomegranate-vinaigrette
Best Utah Wedding Photographer

Florist/Host
Amber Reverie
Amber Reverie Floral and Event Design
http://amberreverie.com
IG: @amberreverie

Menus
Annie Mertlich
Wildfield Paper Co.
https://www.wildfieldpaperco.com
IG: @wildfieldpaperco

Location:
Ember SLC
http://emberslc.com
IG: @emberslc

Plates and Flatware:
West Elm
https://www.westelm.com
IG: @westelm

Napkins:
Sur La Tab
https://www.surlatable.com
IG: @surlatable

Table Runner:
Silk and Willow
https://www.silkandwillow.com
@silkandwillow

SaveSave

SaveSave

SaveSave

Filed Under: UncategorizedTagged With: Amber Reverie, Community over Competition, Dinner Party, Ember SLC, Galentines, How to throw a dinner party, Luncheon, Park City Wedding Photographer, Salt Lake Wedding Photographer, Sur La Tab, Table Runner, Utah Photographer, West Elm, Wildfield Paper Co

Summer Dinner Party

January 18, 2018

I have always loved to cook, once I moved out for college, I was always cooking for my friends and roommates.  It was one of my favorite things, maybe while I was single there may have been other motives…. hahah… other than just my love to entertain and to cook.  For years I have wanted to throw a fancy dinner party in the woods!  This dinner party was supposed to be up at one of my favorite spots in Logan Canyon, but my husband was super sick that day and there was no way I was going to be able to haul it all up and do it by myself.  My mom stepped in and came and helped and we changed locations and did it in a local park and it was still so fun!  This year will be the year to have a dinner party in my dream location!

While I prepped for this dinner, I thought to myself multiple times I am so crazy… what am I doing??  But once I got everything unloaded at the park and started to set up, I was so dang happy and loved every minute of it!  One of the keys to throwing a successful dinner party is choosing the correct menu, you want to choose things that can be prepped or made the day before.  It also helps to have amazing florist friends that help with the decor.  The beautiful flowers at this table were done by my good friends at Dahlia Event Planning and Floral Design.

Here is the menu that I chose and some of my favorite recipes that I used.  I wanted to do most of it from my garden, so I chose things that would be ripe the beginning of August. (And I just saw this error, I did this dinner almost a year and a half ago, and I never noticed.. but I gave the calligrapher the wrong word for one of the menu items…. It is supposed to be a Charcuterie Board….I put chartreuse board….  Whoops!)

Menu

Appetizers

Heirloom Tomato Galette

Charcuterie Board

Tapas

Salad

Golden Beet Salad with Avocado & Feta

Entree

Herb Roasted Salmon Filet

Parmesan Roasted Red Potatoes

Garlic Roasted Green Beans

Dessert

Wild Huckleberry Lemon Cream Tart

Drinks

Homemade Ginger Ale

Italian Cream Soda with Fresh Apricot Syrup

Summer Dinner Party
Summer Dinner Party
Summer Dinner Party

Tapas with Paprika Smoked Tomato Jam

1 dry quart orange grape tomatoes, chopped

1 1/4 cups sugar

1/4 cup bottled lemon juice

2 tablespoons cider vinegar

1 1/2 tsp fine sea salt

1 1/2 tsp red chile flakes

1 tsp grated fresh ginger

1 tsp smoked paprika

1/4 tsp cayenne pepper

Directions: Combine all of the ingredients in a nonreactive pot.  Bring to a boil and then lower the temperature to a simmer.  Stir regularly, gently boil the jam until it reduces to a jam consistency.  About 45 minus.

When the jam is almost done, prepare a boiling water bath and 3 half pin jars.  When it is done fill three jars with 1/2 inch headspace, wipe the rims, apply lids and rings and procession a boiling water bath for 15 minutes.

(Recipe from Preserving by the Pint, by Marisa McClellan, I love her book I highly recommend it!)

Prepare Tapas, slice baguette, top with ricotta cheese and put a dab of this yummy tomato jam on top.

When my mom and I went to Spain the previous year we had some amazing tomato jam on the tapas that we tried there.  I had to find a good recipe when I got home and this is the perfect recipe to put together for parties and gatherings.  It is also good on panini sandwiches.
Summer Dinner Party
Summer Dinner Party

I got the cheese from my favorite local Cheese Maker!  Rockhill Creamery is the best!  And I love supporting local farmers and artisans.
Summer Dinner Party
Summer Dinner Party

Heirloom Tomato Galette

for the filling:

1/4 cup (50g) freshly grated Parmesa

2 ounces (57g) cream cheese, at room temperature

1/4 cup (60g) mayonnaise

1/4 medium onion, diced (about 1/4 cup / 40g)

1/2 teaspoon fresh thyme leaves, optional

1/4 teaspoon freshly cracked black pepper, or to taste

for the crust:

1 cups (125g) flour

1/4 cup (1/2 stick / 60g) cold unsalted butter, cut into 1/2-inch (12-mm) pieces

1/2 teaspoon kosher or sea salt

1/4 cup (60ml) cold water

Heavy cream or egg wash, for brushing crust

3 to 4 medium tomatoes, sliced 1/4 inch (6 mm) thick

kosher or sea salt, to taste

fresh cracked black pepper, to taste

directions:

Preheat the oven to 375°F (190°C). Line two sheet pans with parchment paper.

Make the filling: In a bowl, mix the Parmesan, cream cheese, mayonnaise, onion, thyme (optional), and pepper to taste until well combined. Set aside.

Make the crust: In a separate bowl, pinch together the flour, butter, and salt with your fingertips until most of the big chunks of butter are flattened or broken up. In another bowl, whisk the egg with the ice water until combined. Incorporate the egg mixture into the flour until the mixture binds together and forms a rough ball (you may need to gently knead the ball to incorporate the last of the flour).

Flatten the ball into a disk. Wrap in plastic wrap and place it in the fridge. Chill for 30 minutes or up to overnight.

On a floured surface, roll the disk out to a circle slightly larger than 10 inches (25-cm) in diameter.

Trim the dough into an even 10-inch (25-cm) circle (we use a 10-inch / 25-cm ring mold to cut the dough). Gently wrap the dough around a rolling pin, then unroll it onto one of the prepared sheet pans. Spoon the Parmesan–cream cheese mixture in the center of dough circle, spreading the mixture out evenly to within about 2 inches (5 cm) of the outside edge.

Place one to two layers of sliced tomatoes over the cheese mixture. Fold the edge of the dough over the tomatoes. Brush the crust with the cream or egg wash. Season crust and tomatoes with salt and pepper.

Bake for 50 to 60 minutes, or until the crust is golden, rotating the pans halfway through so the galette will bake evenly. Serve warm or at room temperature.

(Recipe from Bountiful by Todd Porter and Diane Cu, another favorite cookbook)

One thing that I love about this recipe and galettes is that you can make the dough several days before and then it is so easy to prepare right before the party, and it can be cooked in the morning and eaten in the evening.  I also love galette doughs if you have a food processor, this dough can be made in less than five minutes and it tastes and looks like it took a lot longer!

Summer Dinner Party
Summer Dinner Party

Golden Beet Salad with Avocado & Feta

ingredients:

3 medium golden beets

1 tsp grated lemon zest

1 1/2 tbsp fresh lemon juice

1/4 tsp black pepper

1/8 tsp kosher salt

1 large shallot

2 tbsp extra virgin olive oil

4 cups arugula

1 ripe avocado peeled and slices

1 ounce feta cheese, crumbled

directions:

wrap beets in tinfoil and bake them at 400 degrees for 45-50 minutes, peel and slice when cooled.

combine lemon zest, juice, black pepper, salt, and shallot, let stand 10 minted before adding in olive oil.  Toss arugula with dressing half of the dressing, toss beets in remaining dressing.  Put arugula in a bowl, top with beets, avocado and feta.

(Recipe from Cooking Light Magazine)
Summer Dinner Party

Salmon Filet

Drizzle with Olive Oil and season with salt and pepper.

Top with assorted chopped fresh herbs, dill, parsley, thyme and oregano.

Thinly slice lemons and put on top.

We baked it in the Pizza oven at about 450 degrees for 20 minutes.

We have a Camp Chef Pizza Oven and we took this to the park and cooked it there, it is like an easy bake oven for adults, we love it!
Summer Dinner Party

Wild Huckleberry Lemon Cream Tart

tart dough :

5 ounces all-purpose flour

1/2 tsp kosher salt

6 tbsp cold unsalted butter, cut into small pieces

3 tbsp ice cold water

huckleberry topping:

3 1/4 cups wild huckleberries

3 tbsp granulated sugar

1 tsp grated lemon zest

lemon curd whipped cream:

1 large egg

2 large egg yolks

1/2 cup granulated sugar

1 1/2 tbsp cornstarch

1/2 cup fresh squeezed lemon juice (approximately 3 large)

2 ounces unsalted butter, cubed and at room temperature

1 cup cold heavy cream

directions:

tart dough:
Place the flour and salt in a food processor. Pulse 3-4 times to combine. Add the butter and continue pulsing until the butter is chopped up and the mixture looks like coarse cornmeal. A few larger pieces are fine.
With the machine running, swiftly add the cold water. Immediate stop the machine when the dough comes together.
Turn the dough out onto plastic wrap and flatten into a thin, round disk. Wrap and place in the refrigerator for at least 30 minutes or up to 3 days.
On a light floured surface, roll the dough to approximately 12 inches in diameter. Gently place in the tart pan. If using a fluted pan, use your thumb to gently press the dough into the flutes. Trim away any excess dough, leaving a slight overhang to account for oven shrinkage. Chill for an additional 30 minutes while preheating the oven to 375 degrees F.
Use a fork to prick numerous holes in the bottom and just up the sides of the dough (not all the way through to the pan). Line the pan with foil and weigh down with dried beans. Place on a baking sheet and bake for 20 minutes, or until the tops are firm. Carefully remove the foil and beans, then continue baking for another 10 minutes or until the dough is firm on the bottom. Allow to cool.
huckleberry topping:
Place the huckleberries, sugar, and lemon zest in a medium-sized saucepan. Stir to combine.
Turn the heat to medium. As liquid fills the pan, turn the heat up to high and bring the mixture to a boil, stirring periodically. Reduce the heat to medium-low and simmer, stirring periodically, until the liquid has thickened up, approximately 10 minutes. Allow to cool for 5 minutes, then place in the refrigerator to chill.
(I ran out of time for this step and just put fresh huckleberries on top and it was still delicious!)
lemon curd whipped cream:
In a medium-sized saucepan, whisk together the egg, yolks, and sugar until smooth. Place the cornstarch in a small bowl or ramekin and whisk in a small amount of the lemon juice to create a slurry. Add the slurry and remaining lemon juice to the saucepan, and turn the heat to medium.
Whisking constantly, cook until the curd has thickened, approximately 5-7 minutes. Remove from the heat and whisk in the butter until the curd is shiny and smooth. Allow to cool for 5 minutes. Transfer to a clean bowl, press plastic wrap directly against the curd to prevent a film from forming, and place in the refrigerator until cold.
Once the curd is cold, transfer to a large bowl. Using a spatula, stir vigorously for several seconds to loosen it up. In a separate bowl, whisk the cream until it reaches a stiff peak.
Stir approximately 1/3 of the whipped cream into the curd, then fold in the remaining whipped cream until evenly combined.
Spread evenly into the tart pan, and top with the prepared huckleberry mixture.
(Recipe adapted from Savory Simple’s Wild Blueberry Lemon Cream Tart)
One of my favorite summer activities is to go Huckleberry picking, the dinner party was a little too early in the season, so there was not a lot ripe when I went to pick them for this dessert.
Summer Dinner Party
Table and Chair Rentals: Ella Bella Floral
Flowers: Dahlia Event Planning and Floral Design
Menus and Name Tags: Hello Tosha
Plates: Anthropologie
Copper Flatware: West Elm
Summer Glasses: World Market
Swing Top Bottles: Amazon
Grey Linen Napkins: Sur La Tab
Drink Dispenser: World Marker

SaveSave

SaveSaveSaveSaveSaveSave

SaveSaveSaveSave

SaveSave

Filed Under: UncategorizedTagged With: Amazon, Anthropologie, Anthropologie Home, Dahlia Event Planning and Floral Design, Dinner Party, Entertaining, Garden Party, Hello Tosha, Hosting, Jessica Parker, Jessica's Photography, Park City Wedding Photographer, Salt Lake City Wedding Photographer, Summer Dinner Party, Summer Party, Sur La Tab, Utah Wedding Photographer, West Elm, World Market

Fall to Winter Inspiration Shoot

April 26, 2016

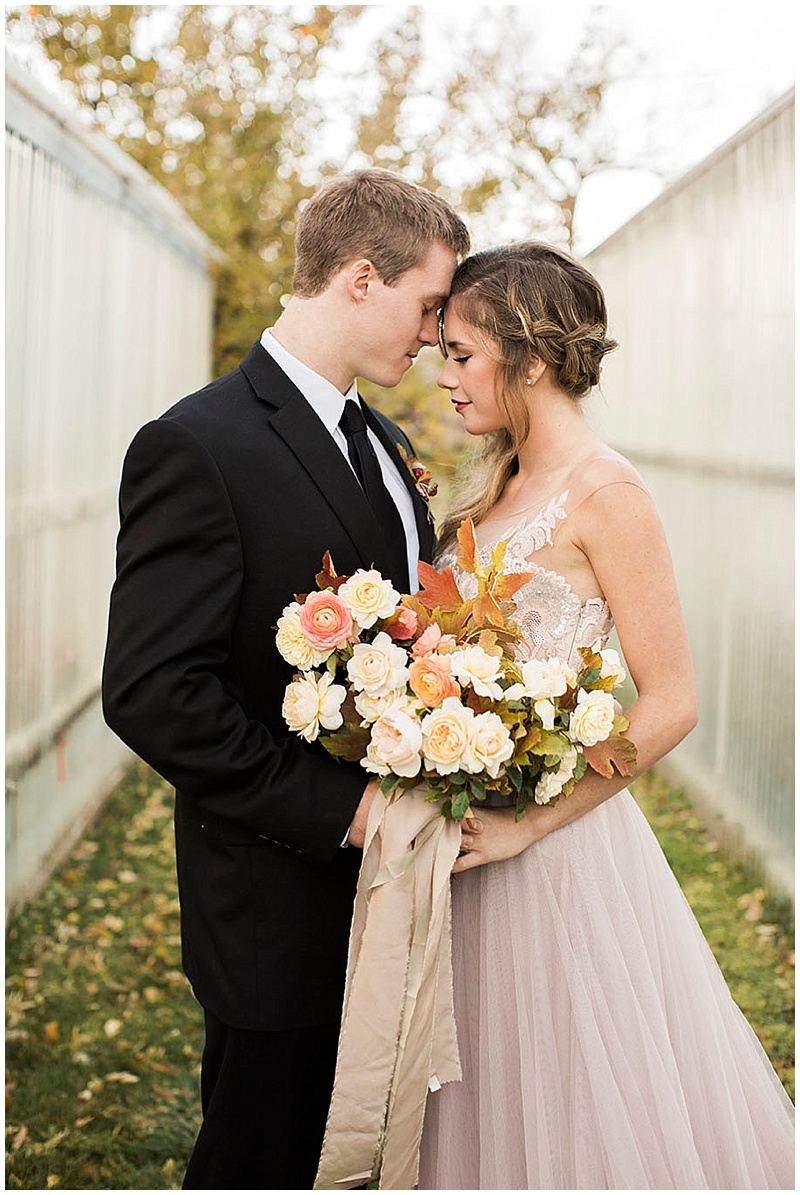
This amazing photo shoot that I put together was featured on Magnolia Rouge today!  I just love their blog, so much inspiration and beauty! Nicole Land with Soil and Stem is so amazing, her flowers are a dream to photograph!  Fonnesbeck Greenhouse in Mendon, was the perfect little spot for our inspiration!  I always love working with Taylor Wood for hair and makeup, if you go back a few posts you can see some photos of her cute family, she is one of my favorite clients too!

Soil and Stem
Soil and Stem
Soil and Stem
Soil and Stem
Soil and Stem
Soil and Stem
Soil and Stem
Soil and Stem
Soil and Stem
Soil and Stem
Soil and Stem
Soil and Stem
Soil and Stem
Soil and Stem
Soil and Stem
Soil and Stem
Soil and Stem
Soil and Stem
Soil and Stem
Soil and Stem
Soil and Stem
Soil and Stem
Soil and Stem
Soil and Stem
Soil and Stem
Soil and Stem
Soil and Stem
Soil and Stem
Soil and Stem
Soil and Stem
Soil and Stem
Soil and Stem
Soil and Stem
Soil and Stem
Soil and Stem
Soil and Stem
Soil and Stem
Soil and Stem
Soil and Stem
Soil and Stem
Soil and Stem

 JESSICA’S PHOTOGRAPHY / BHLDN / TULIE BAKERY / TAYLOR WOOD / HUCKLEBERRY PAPER / ANNIE BEE CAKERY / WEST ELM / SUR LA TAB / FONNESBECK GREENHOUSE / ELLA BELLA FLORAL / SOIL & STEM / SILK AND WILLOW/ TRENT SANDERS & EMMA GIESEA

Filed Under: UncategorizedTagged With: Annie Bee Cakery, Best Logan Utah Wedding Photographer, Best Salt Lake Wedding Photographer, BHLD, BHLD Wedding Dress, Featured on Magnolia Rouge, Fonnesbeck Greenhouse, Huckleberry Paper, Logan Utah Wedding Photographer, Magnolia Rouge, Nursery, Salt Lake Wedding Photographer, Silk and Willow, Soil and Stem, Soil and Stem Centerpiece, Soil and Stem Florals, Sur La Tab, Taylor Wood Hair and Makeup, Tulie Baker, Utah Wedding Photographer, Wedding Inspiration, Wedding Photographer

Let’s Connect

  • Instagram
  • Pinterest
  • Facebook

Recent Posts

  • Jackson Hole Destination Wedding | Matt and Sarah
  • High West Distillery | Park City Wedding
  • Saint Mary’s Catholic Church | Park City Wedding

Welcome

Hi, I’m Jessica! I am very passionate about photography, everything that I do revolves around my camera and creating exceptional photos for you to remember every stage of life. I have been a professional photographer for over 15 years, and I still get excited about every shoot. I love being creative and going on adventures, and I try to bring that experience into my shoots, by exploring the mountains, chasing the light, and helping you relax in front of the camera! Thanks for stopping by, let’s work together!

e: jessica@jessicasphoto.com

Copyright © 2023 · Lady Jane Theme on Genesis Framework · WordPress · Log in